Bluetooth Controlled RGB LED Matrix

Project Overview #
If you like colorful and flashing LED lights, you are going to love this project. I’ve been looking for a small, rechargeable and powerful RGB LED matrix for a while. The idea is to use it for regular product photography, as an on-camera flash and/or as a fill video light. There are some nice products on the market, but they fall short on some of the specs, didn’t fit all my needs or just were too expensive.
After some weekends, I put together this little LED light project. It’s functional, reliable and a lot of fun to use. Here are the main features:
- Bluetooth enabled and controllable.
- Rechargeable battery through a regular USB port.
- OLED status screen showing key information on current light settings, battery and Bluetooth connection.
- RGB LEDs, so there is no need to deal with color gels or colored plastic sheets.
- Kelvin mode for selecting light/color temperature from the iOS App.
- RGB mode for selecting any color from a color palette on the iOS App.
- Brightness adjustment on both modes set from the iOS App.
I’ve also designed a compact 3D printed case. Links to all components and code can be found below.
Software #
The software side of the project is crucial as it’s the main way of interacting with the Neopixel (RGB) matrix. All features except turning the device on and off, are managed from the iOS device. This section is comprised of two parts: what’s running on the microcontroller and the iOS component. Source code can be found on the GitHub repository for the project.
iOS Software #
The iOS side is handled by Adafruit Bluefruit LE connect App. The App offers plenty of options for interacting with BLE devices (i.e. Smart Bluetooth or Bluetooth Low Energy capable devices). For this project, we’ll be using Control Pad and Color Picker submodules from the Controller mode.
![]()
The Color Picker is probably the easiest and fastest way of having the Neopixel matrix output different colors. Just select the color and tap on the “Send selected color” button.
The Control Pad needs a bit more explanation:
![]()
Button 1: Turns off the neopixel matrix (sends a 0,0,0 RGB value) and sets the brightness to 100%. Button 2: Turns the neopixel matrix to full blast (sends a 255,255,255 RGB value) and sets the brightness to 100%. Button 3: Shows a multicolor random animation for three seconds. Right Cursor: Increases the led matrix brightness in 10% increments. Left Cursor: Decreases the led matrix brightness in 10% increments. Up Cursor: It accesses the Temperature Mode (see below) and increases the color temperature by 250K. Up Cursor: It accesses the Temperature Mode (see below) and decreases the color temperature by 250K.
These settings, along with general matrix status info are shown on the OLED screen on the back of the device.
Microcontroller #
The microcontroller was programmed through the Arduino IDE (C language). My first option was to use MicroPython or Adafruit’s CircuitPython, but its implementation on the Bluefruit nRF52 at the time of writing was on Alpha stage.
Arduino Code
The Arduino sketch uses the following libraries to manage the neopixel matrix and OLED screen, so make sure they are installed through the Arduino IDE’s “Manage Libraries” section:
- bluefruit (Adafruit)
- Wire
- Adafruit_GFX
- Adafruit_SSD1306
- Adafruit_NeoPixel
The sketch is actually comprised of three different files:
- Bluetooth_LED_Matrix: This is the main program, key variables and constants are defined at the top, before the setup function.
- graphicFunctions: All functions used for handling the neopixel matrix and the oled screen are included in this file. I designed all icons/graphics seen on the OLED screen from scratch, pixel by pixel (quite literally). These functions are also included in this file.
- packetParser.cpp: The code in this file does all the heavy lifting regarding bluetooth communication. It’s provided by Adafruit on their example sketches and I’ve left it unchanged.
Operating Modes
There are two main operating modes:
a. Color Picker Mode
Just select the desired color on the iOS App and send it to the neopixel panel. Follow the instructions on the previous section.
b. Temperature Mode
In this mode, the neopixel matrix produces light ranging from extremely warm to extremely cool white. The actual kelvin range is defined on the code and goes from 1,000K to 10,000K. (Complete white is achieved at around 6,250K). The RGB to Kelvin temperature calculation is made based on this article on the subject. Since the neopixel matrix is an RGB matrix (as opposed to RGBW), color temperature will tend to be warmer towards both the lower and upper ends of the range, but it’s good enough for most photography scenarios.
The intent of this mode, is to mach other light sources in the scene without the need of additional color correction filters. To change the light color temperature, just use the up and down cursors on the iOS App as explained above.
Oled Screen
The OLED screen shows the status of the device at all times. On the top left corner the battery level is shown and on the top right corner a little Bluetooth icon shows up whenever a Bluetooth connection with an iOS device is stablished. The icon disappears as soon as the device is disconnected.
The following row shows either the current matrix RGB code or the light color temperature (in Kelvin), depending on the active mode. Finally, the last row shows the brightness intensity.
Hardware #
Components #

Here is a detailed list of the components used:
- Bluefruit nRF52 Adafruit feather board.
- 8x8 RGB Neopixel matrix (WS2812B) controller. I used this one, but I would guess this one would also work. Adafruit’s version would definitely work.
- Adafruit 2,500,Ah Lithium iOn Polymer battery.
- 128x64 I2C OLED display.
- Adafruit Perma-Proto Quarter Breadboard PCB.
- 6-Pin, 2-position DPDT slide switch.
- Adafruit Feather Header Kit.
- 2 x 4.7 K resistors and 1x 470 ohm resistor. This resistor pack has several of each (and a ton more).
- 24 AWG silicone wire.
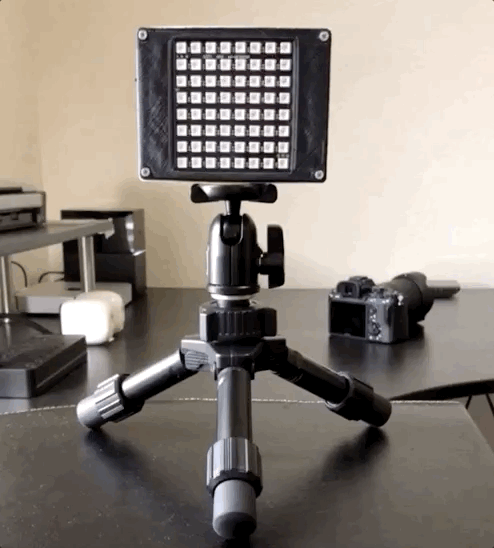
- Camera tripod adapter.
If you are printing the case yourself, you’ll need an appropriate filament. Since I’ll be using this outside, I decided to use ABS instead of PLA. Here are the color I used:
- Gizmo Dorks 1.75mm ABS Filament.
- HATCHBOX ABS 3D Printer Filament, Silver.
- HATCHBOX ABS 3D Printer Filament, Black.
Assembly #

As seen on the schematic above, the Neopixel matrix is directly connected to the Lipo battery (through the Bat pin on the nRF52 board). I noticed that even when both the RGB matrix and the board were turned off, the Neopixel matrix kept draining the battery. It seems that the tiny controllers on the RGB LEDs kept drawing small amounts of current even when the LEDs are off . I solved this issue by using a double pole switch (DPDT) instead of a regular SPDT switch. Thus, when in the “Off” position, the switch connects the Enc pin to Gnd pin on the board, effectively disabling the voltage regulator and hence, turning off the board. At the same time, it disconnects the RGB matrix from the Bat pin on the board. The operation is reverted when the switch is toggled into the “On” position.
In order to keep the circuit assembly compact, I have used an Adafruit Perma-Proto Quarter Breadboard. Note that this breadboard is not designed to fit feather boards, because it is one pin hole too small. I was able to fit the nRF52 feather board by cutting the Rst pin on the longest Adafruit Feather Header as it’s not being used.

Although the Feather header adds a couple of extra millimeters to the setup, I decided to add one to make it easier to solder components on the breadboard and to have the flexibility of easily swapping feather boards in the future (perhaps once CircuitPython is ported to the nRF52).
There are three resistors being used in the assembly: two 4.7 Kohm pull up resistors are connected to the SDA and SCL pins on the board. These are needed for the OLED screen to work reliably. The 3rd resistor is connected to the digital output pin controlling the Neopixel matrix. Per Adafruit’s Neopixel Guide:
Adding a ~470 ohm resistor between your microcontroller’s data pin and the data input on the NeoPixels can help prevent spikes on the data line that can damage your first pixel. Please add one between your micro and NeoPixels! Our NeoPixel rings already have this resistor on there

3D Printed Case #

I tried to keep the case fairly compact but with enough space to easily arrange wires and battery. Most of the components are screwed in using M2.5 screws/holes. I’ve included a larger hole to accommodate the camera tripod adapter.
The case is designed so the battery is resting on a couple of supports and the oled screen supporting frame. I used double-sided tape strips to keep it from moving around. I’m including the STL files on the GitHub repository for direct printing. However, is anybody is interested in getting full parametric design files, feel free to reach out to me or leave a comments below.

