HomeKit Compatible Freezer Temperature Monitoring System

Table of Contents
Project Summary #
This post goes through the process of building a freezer temperature monitoring device. Here are the main features:
- It triggers an alarm signal whenever the freezer temperature goes above a predefined threshold for a certain period of time.
- Real time temperature readings are sent to Adafruit.IO private IoT portal.
- Device is fully compatible with Apple’s HomeKit. Therefore, Home automations can be setup to be executed upon high temperature alarm (i.e. lamp in bedroom turns on bright red).
The diagram below shows all the hardware components and how they communicate with the Homebridge server, router and mobile devices.

My main motivation to work on this project was leaving the garage freezer’s door open a couple of times at home and losing whatever we had in there. In a way, the investment associated with this project paid for itself … several times.
Below is a video showing the general arrangement:
This is not a difficult project, but there are several moving parts associated with it. No worries, I’ll be thorough in the sections below.
Hardware #

Component list #
- Unexpected Maker Feather S2.
- Adafruit temperature sensor PCT2075.
- Stemma QT I2C cable. Adafruit sells these cables in smaller lengths. I just bought one of their offerings, cut it and extended it using regular AWG 22 silicone cables.
- USB-C cable for feeding the Feather S2.
- Small power supply (to be used to the USB-C cable above).
- Magnets to be inserted underneath the 3D printed case.
- 3D printing PLA filament or PETG filament (in case you decide to 3D-print the case yourself).
- Optional acrylic sheet and attaching small screws.
Since both the Feather S2 board and the temperature sensor are Stemma QT compatible, there is no need for soldering or breadboards, which helps keeping the project compact and very easy to assemble.
3D Printed Case #

The Feather S2 can just be taped up to the freezer’s side, but that’s not very elegant, so I designed and 3D-printed a simple case for it. The case has 4 small holes underneath for small magnets to be inserted in, which allows for easy attachment to either the side or the front of most freezers.
Since the Feather S2’s RGB LED is used as status LED (more on that later), the top of the case is completely open. You can either print a translucent lid (included in the files) or attach an acrylic sheet cut to size.
All STL files for the 3D printed parts can be downloaded from here.
Software #
The Feather S2 has been programmed in CircuitPython and handles the temperature monitoring and alerting logic, internet posting through Adafruit.IO and interaction with the HomeKit framework. This interaction is not done directly but through Homebridge, which should be running in a computer within the same local area network.
See below details on how to setup these components.
Microcontroller #
As previously indicated, the microcontroller is programmed in CircuitPython. Follow Adafruit’s instructions for installing it on the Feather S2 board.
All needed files are included in this zip file, but make sure to use the latest version of the needed libraries as Adafruit updates them very often.
Here is the list of libraries that need to be copied to the lib folder on the board:
- adafruit_bme280
- adafruit_bus_device
- adafruit_dotstar.mpy
- adafruit_pct2075.mpy
- adafruit_register
- adafruit_requests.mpy
- feathers2.py (included with the Feather S2 microcontroller).
The board’s root folder should contain the following files in addition to the lib folder referenced above:
- secrets.py (needs to be created).
- code.py
- pyrightconfig.json (optional)
Note: There are other files in the zipped file. These are files that came with the Feather S2 board and are not needed for this project. They were left in just as reference.
secrets.py
This file holds the credentials for both the local WiFi network and the Adafruit.IO account. Therefore, it has not been included in the project’s bundle. Just create a new file with the following contents:
# This file is where you keep secret settings, passwords, and tokens.

secrets = {
    'ssid' : 'YOUR WIFI SSID',
    'password' : 'WIFI PASSWORD',
    'timezone' : "America/Chicago", # http://worldtimeapi.org/timezones
    'aio_username' : 'YOUR ADAFRUIT.IO USERNAME',
    'aio_key' : 'YOUR ADAFRUIT.IO KEY',
    'server_ip': 'SERVER IP:PORT',
    }
The server_ip field refers to the computer’s IP and port on which Homebridge is running. All other fields are self-explanatory.
code.py
This file holds the main script, which handles the sensing logic, wifi connection and communication with Homebridge and Adafruit IO. I’ve included comments in the code to make it easy to read and maintain. Here is what the script does in general terms:
- Imports needed libraries and sets up the dotstar (i.e. status LED), i2c bus and temperature sensor instances.
- Assignes values to Constants that will be used in the sensing and alerting logic. This is the only section of the script that would need to be revised according to your needs:
IO_POST_TIME: Posting interval to Adafruit.IO in seconds.
LOOP_INTERVAL:_ How often temperature should be sensed (seconds).
TEMP_LIMIT: Temperature in Celsius at which the high temperature condition will be triggered. This value should be picked based on the Freezer’s temperature control and cooling cycle. Use the default value and check the cooling cycle reported to Adafruit.IO. Then, adjust as needed.
WAITING_TIME: Time in seconds for which the sensed temperature should be above the TEMP_LIMIT before sending the High Temperature Alert to both Homebridge and Adafruit.IO.
RETRY_TIMES: Number of times the script should attempt to post values to either Homebridge or Adafruit.IO.
- Sets up WiFi connection and both Adafruit.IO and Homebridge communication.
- Enters an infinite loop in which temperature values from the sensor are read based on the Constants defined above. These temperature values are posted to both Adafruit.IO and the Homebridge server. If the temperature goes above the
TEMP_LIMITvalue, a timer - set to last the amount of seconds defined inWAITING_TIME- is started. If the temperature remains above theTEMP_LIMITafter the timer ends, the High Temperature Alert is sent to both Homebridge and Adafruit.IO.
The status LED (dotstar) on the Feather S2 board will blink Red if the High Temperature Alert has been triggered, and it will turn blue if an error occurs (i.e. runtime error, error importing WiFi credentials, failure to post data to Homebridge or failure to read temperature). Additionally, it will turn green if values cannot be posted to Adafruit.IO.
Note that there seems to be a couple of bugs associated with some Adafruit CircuitPython libraries. I worked around those bugs in the code and included comments explaining what I did. Shout out to the people in the Adafruit’s Discord channel who helped me troubleshoot some of these issues.
If you are planning to leave the device outside or easily accessible by others and you feel a bit unnerved by leaving your WiFi network’s password out in the open, a good option might be compiling secrets.py using the mpy-cross tool and including the resulting .mpy file in the board instead. Although this is not the same as encrypting the file, it’s the next best thing.
pyrightconfig.json
This file is optional. I’m using VSCode on a Mac to program the Feather S2 following this method. This file prevents VSCode from always warning about “Shadowed Imports”. This file is not needed if the CircuitPython code is being written directly on the board.
Homebridge #
HomeBridge is an amazing piece of software that allows non-HomeKit certified IoT devices to connect to Apple’s HomeKit framework. Installation is pretty straight forward, just follow the instructions here. As indicated above, it should be installed on an always-on computer.
One of HomeBridge’s key features is the amount of plug-ins made available by the community, from garage openers to Smart TVs and AC units. For this project, you’ll need to install the Webhooks plug-in, which is a general purpose web API. Follow the installation instructions on the plug-in’s website. Once installed, the following should be added to plugin’s JSON configuration file:
{
            "platform": "HttpWebHooks",
            "webhook_port": "PORT",
            "cache_directory": "PATH_TO_HOMEBRIDGE_FOLDER/.node-persist/storage",
            "sensors": [
                {
                "id": "freezer-temp",
                "name": "Freezer Temperature Sensor",
                "type": "temperature",
                "autoRelease": false
                }
            ]
        },
Note: cache_directory may not be needed.
Where:
PORT: default installation port (52828).
PATH_TO_HOMEBRIDGE_FOLDER: is usually Users/username/.homebridge on a Mac.
Once HomeBridge is installed and configured, it will run every time the computer is started up, with no additional interaction on your part.
Here is a picture of a HomeKit notification being sent to an iPhone:

Adafruit IO #
Adafruit IO is a platform designed by Adafruit to display and interact with IoT projects. It’s very easy to get started with, has a great user interface, powerful visualization tools and rock solid connection. They offer a very permissive free tier too (just be mindful of their servers and don’t hit them with many requests). I haven’t found a better or easier way to interact with IoT projects.
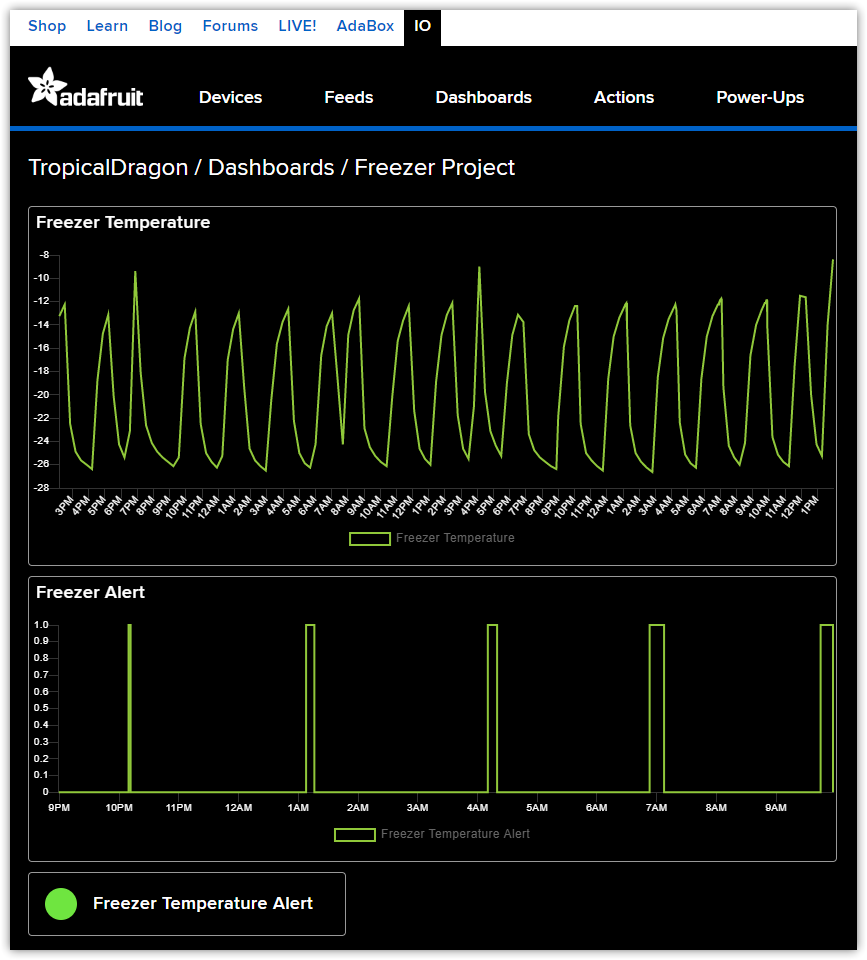
Here is a screenshot of a dashboard I put together for this project showing freezer temperature variation and freezer alert signals:
I had a lot of fun building and playing with this project. As always, feel free to either reach out to me via email or leave a comment below if you have any questions.