Overview
My wife and I had our daughter a year and a half ago. At that time we were looking to buy one of the regular baby monitors to check on the baby while she was in her nursery. We almost pull the trigger on one of the sets that run for more than $300, but something didn’t feel right. Only the most expensive ones offered video capabilities and the video quality wasn’t that good. In addition, you were supposed to use their handsets/video receivers with tiny screens, which wasn’t that practical.
I knew there must be a better (i.e. geekier) way to accomplish the same or better results with today’s webcam technology. I did some online research and narrowed down my options to wireless IP cameras. After reading lots of reviews and testing a couple of these cameras, I settled with the Foscam wireless camera.
Advantages over regular Baby Monitors:
- The video feed can be accessed from mobile devices such iPhones and iPads.
- The camera movement can also be controlled from mobile devices.
- There is an option to talk back to the baby (although we don’t use it that much).
- The Foscam camera has night vision capabilities (not all baby monitors come with this feature).
- For the obsessive people out there: the camera can be set to send alerts or save imageswhen there is movement in the room (I played with this for a while but I’m currently not using this feature).
Note: This post contains affiliated links. If you want to support this site, please buy the software and/or hardware through the links included in the post.
What is Needed?
- WiFi router. Most people already have this device. you will need the Admin Password to get into the configuration page for the device.
- Foscam Camera
- iOS App for controlling your camera from iPhone, iPad or iPod Touch. There are many applications in the App Store capable of doing this, but after testing the top ranking ones, I settled with FoscamPro. I’ve been using it for more than a year with no problems at all.
Router Initial Configuration
You must be able to access your router’s Admin page to perform the steps below. If it is a Linksys router, it can usually be accessed by typing in your browser the following IP address: http://192.168.1.1 and logging in with your Admin credentials. Check your router’s manual for more information.
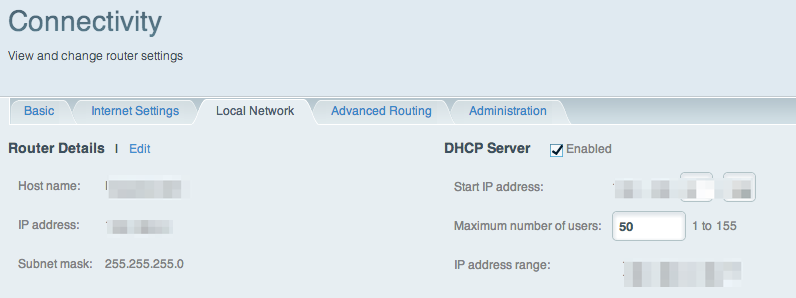
Your router should be configured as a DHCP server (see image below). This basically means that it will automatically assign an IP address to every device that successfully connects to it.
We want the router to always assign the same IP address to the camera so that we can access it from inside or outside our network at any time. Keep reading to find out how to do it.
Camera and Router Configuration
- Turn off the router.
- Connect the camera through a Cat5 or a Cat6 cable (network cable) to one of the network ports in the back of the router.
- Turn the router on and wait for it to start up an assign an IP to the camera.
- Go back to the router’s configuration page, look for the camera assigned IP and write it down, we’ll be using it shortly.
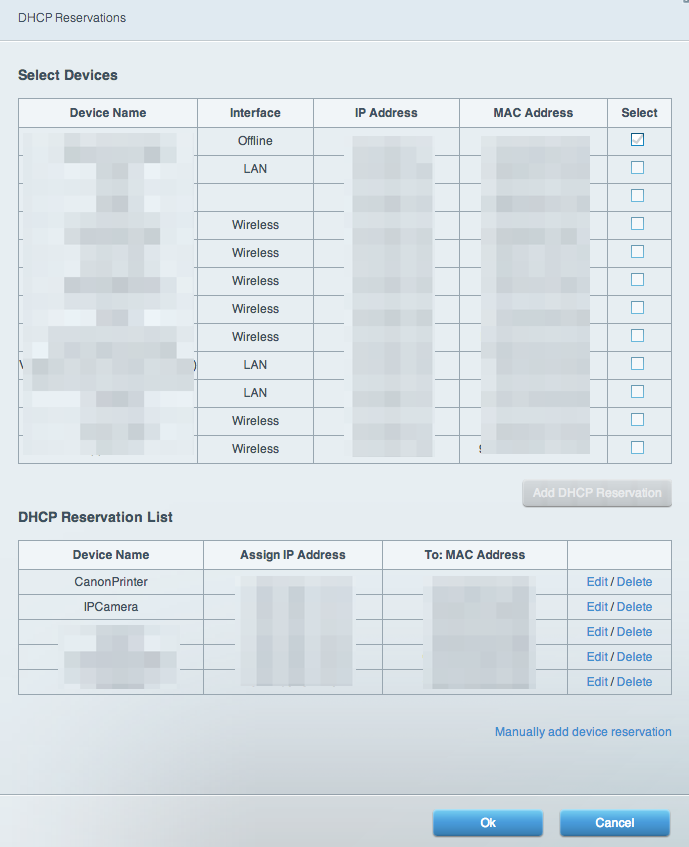
- Look for the option in the router to always assign the same IP address to a connected device based on the MAC address. Router manufacturers call this different ways (e.g. IP allocation, reserved MAC addresses, static addresses, etc.). My Linksys router calls it DHCP Reservation List. Make note of the camera’s MAC address and make sure it is associated to the IP assigned to it (see image below as reference).
- Now, connect to the camera. This is done by typing its IP address in your web browser. You’ll be asked for both an username and a password (see below). Check the camera manual for these credentials.

- Once logged in, you can access all the camera configuration sections, see a live steam and even control the camera’s movement right there from the browser.
For security reasons, I would strongly suggest to create different usernames with different permissions/privileges so that you are not always connected to the camera as Admin (i.e. Administrator). This will come in handy later when setting up the iOS apps.

- Now you can disconnect the camera from the router and rely on WiFi from now on to access it. Make sure to turn it off (i.e. unplug it) and then turn it back on for it connect wirelessly to the router.
Accessing The Camera From Outside Your Home Network
At this point you are able to access the camera from inside your home network. However, the nice thing about this IP camera is that you can actually access it from other internet connected places such as your office, airports and hotels.
In order to accomplish that, you need to know the public IP address of your camera at all times and you need to open a port in your router. We are almost done with the first part as the router is now assigning the same IP address to the camera. However, that is the internal (i.e. home network) address. Your Internet Service Provider (ISP) will assign a public IP to your router, which is the one that is actually reachable from outside your home network. The thing is that, depending on your ISP, that public IP may change frequently.
The easiest way to always know your router’s address is subscribing to a service like Dyndns. It’s a fairly easy process: you sign up and register a domain in the form “yourdomain.dyndns.net”, for example (they have several options). Then, you enter your DynDNS credentials in your router. That way, whenever your ISP changes the assigned public IP address, the router will notify DynDns which will now point to the right address. For practical purposes, instead of using your public IP address, you will now use the domain you registered with DynDNS.
Finally, we need to open a port in the router. For security reasons, routers are designed to block all connections from the internet to your local network. However, we need to open a port to allow a connection to be made from our iOS app to the camera. This is also known as Single Port Forwarding, and the set up window looks like the one below in some of the newer Linksys routers (you get there by going to Security and then Apps And Gaming).
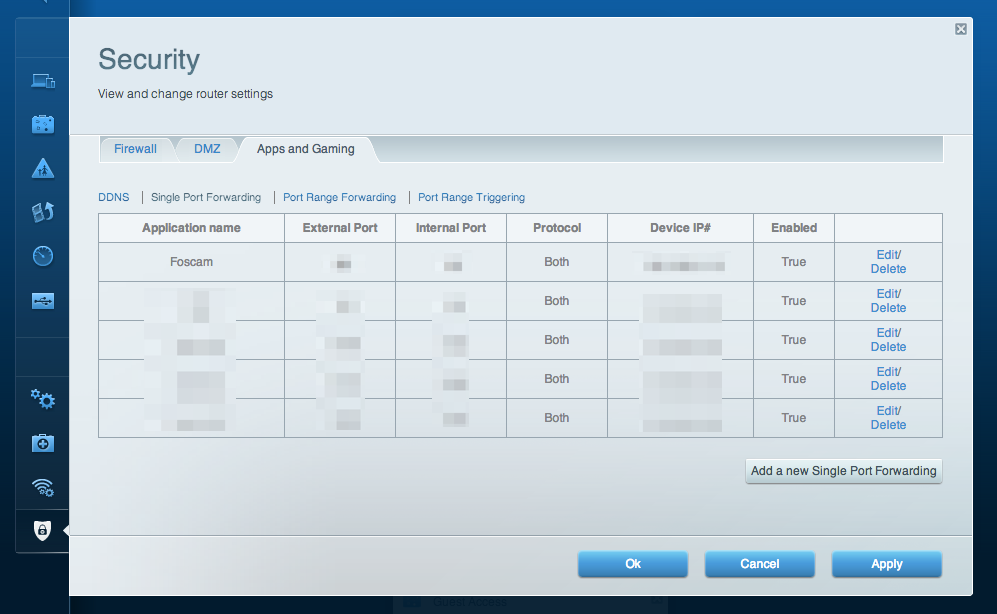
Finally, pick an external port in the router and make it forward all connections made to it to the camera’s web port (port 80 by default) at the camera’s internal IP address (Device IP# in the window above).
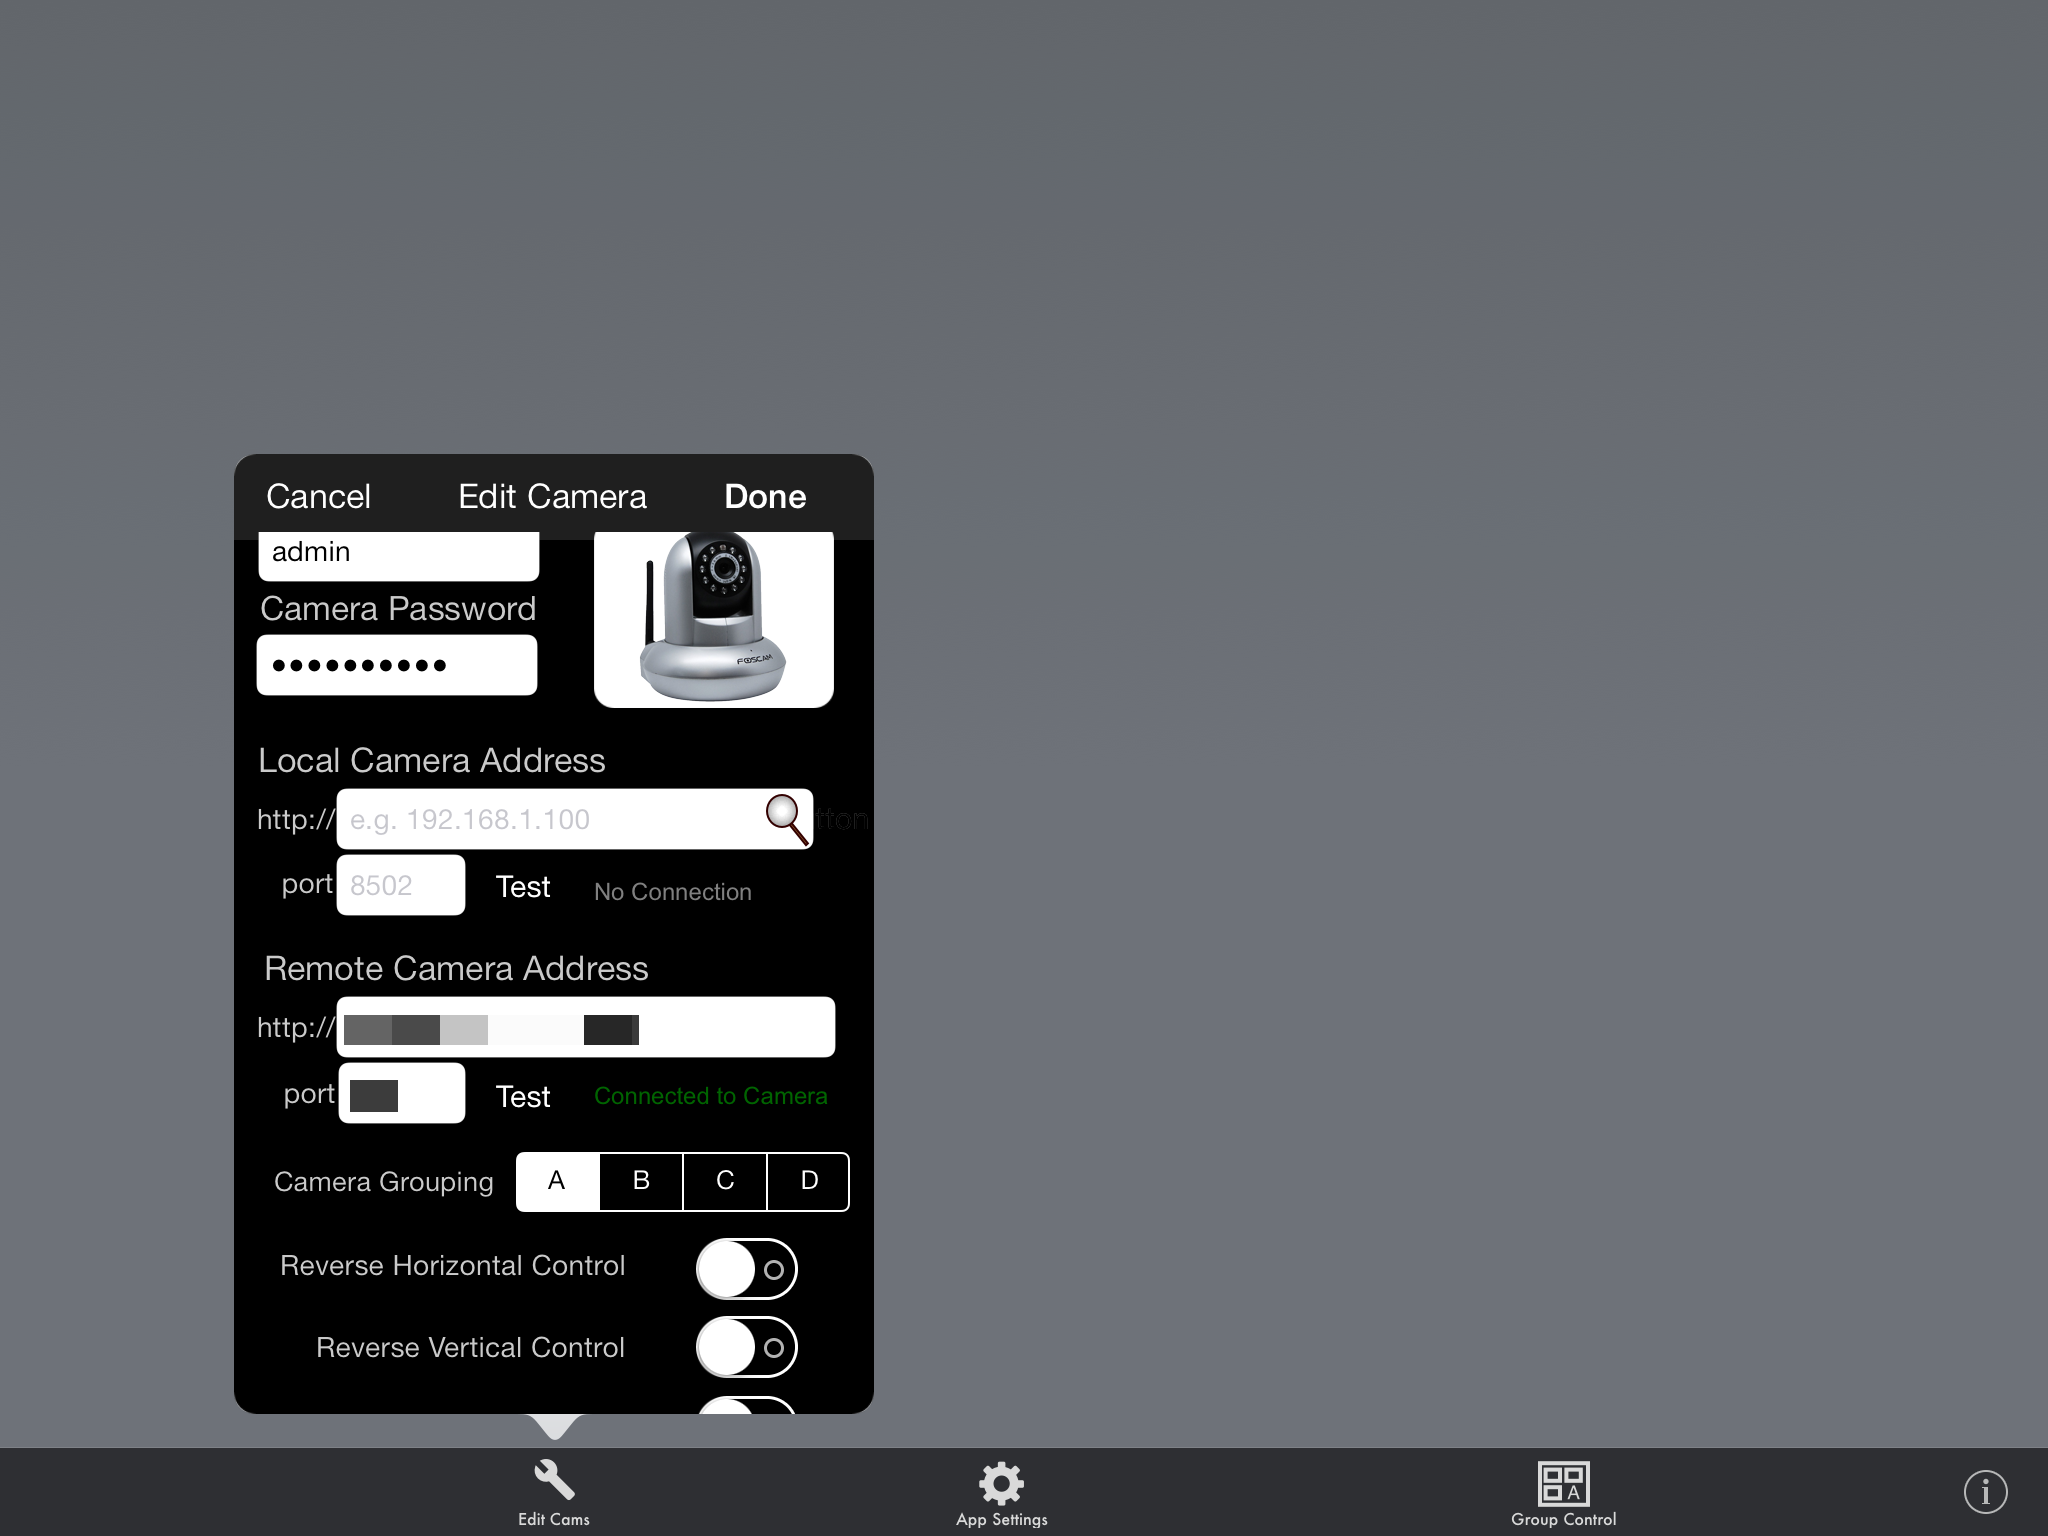
Configuring FoscamPro (iOS App)
This is actually the easiest part of the whole setup. Once you download the FoscamPro App to your iPad, go to Edit Cams, then Add Camera. In the Remote Camera Address section, enter the address (or domain name) you registered with DynDNS along with the external port you picked in the previous step.
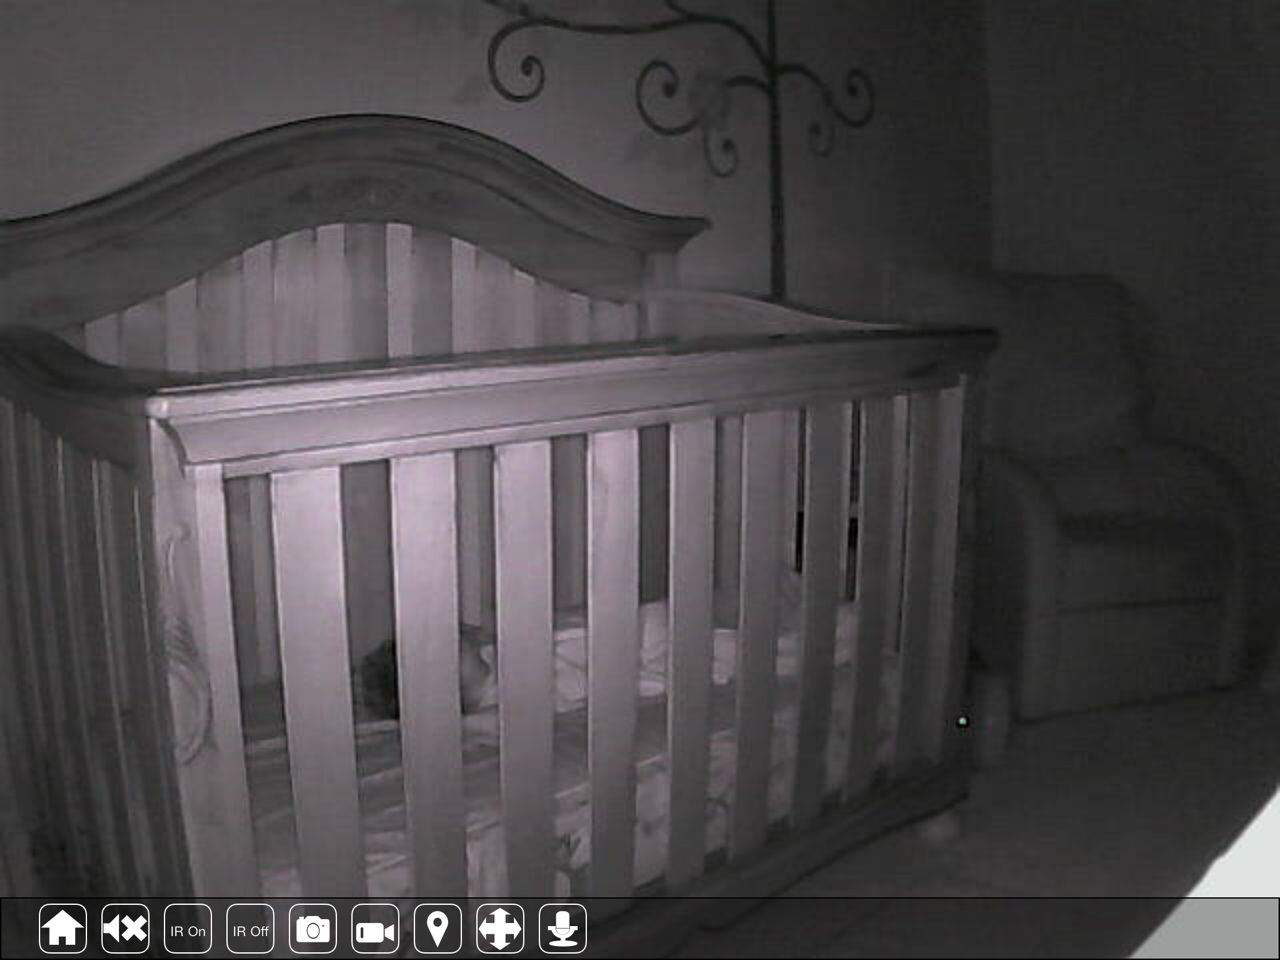
You now should be able to access your camera from both inside and outside your network. Here is a shot of the camera being used in Infrared (IR) mode.